We all know Mother’s Day is celebrated worldwide; a lot is said about presents, but have you ever wondered what’s the story behind the celebration? A few days ago I got curious and decided to research a little more about it.
enhance to alter some things manually; and I raised the contrast a bit, as you can see in the photo above.nn[TERCEIRAFOTO]nnFinal touch upsnWithin "enhance", I increased the "sharpen" level a bit, this tool highlights the details of the photo; and I also increased the "saturation" levels so that the photo would look more alive. Did you see how much more intense does the red look in the second photo?nn[QUARTAFOTO]nnI ended up reducing the temperature a little so the photo wouldn’t look so red, and the photo looked more natural.nn[QUINTAFOTO]nnBefore and afternnDone! Here’s the before and after. Have you noticed how in the first photo there’s a hand in my shoulder but it is gone in the second one? Well, I made it disappear using the “acne” feature, the same one we use to remove pimples and stains we do not want in our photo. You only have to click on the parts you wish to remove, the secret is doing it patiently so the photo won’t get distorted."}” data-sheets-userformat=”{"2":5059,"3":{"1":0},"4":[null,2,13689059],"9":0,"10":0,"11":4,"12":0,"15":"Roboto"}”>This story reminds us, we all should make the most of the time with our mothers as long as we have them with us, enjoying the moment, showing our love and affection every day, so that these memories remain forever in our hearts.
enhance to alter some things manually; and I raised the contrast a bit, as you can see in the photo above.nn[TERCEIRAFOTO]nnFinal touch upsnWithin "enhance", I increased the "sharpen" level a bit, this tool highlights the details of the photo; and I also increased the "saturation" levels so that the photo would look more alive. Did you see how much more intense does the red look in the second photo?nn[QUARTAFOTO]nnI ended up reducing the temperature a little so the photo wouldn’t look so red, and the photo looked more natural.nn[QUINTAFOTO]nnBefore and afternnDone! Here’s the before and after. Have you noticed how in the first photo there’s a hand in my shoulder but it is gone in the second one? Well, I made it disappear using the “acne” feature, the same one we use to remove pimples and stains we do not want in our photo. You only have to click on the parts you wish to remove, the secret is doing it patiently so the photo won’t get distorted."}” data-sheets-userformat=”{"2":5059,"3":{"1":0},"4":[null,2,13689059],"9":0,"10":0,"11":4,"12":0,"15":"Roboto"}”>With photography these moments became even easier to be eternalized, don’t you think so?! And because of that, the photograph should be as beautiful as the moments when they were first captured. That’s why I decided to do a quick tutorial so that you can edit the pictures with your mothers and look even more beautiful using AirBrush. Shall we get started?!
enhance to alter some things manually; and I raised the contrast a bit, as you can see in the photo above.nn[TERCEIRAFOTO]nnFinal touch upsnWithin "enhance", I increased the "sharpen" level a bit, this tool highlights the details of the photo; and I also increased the "saturation" levels so that the photo would look more alive. Did you see how much more intense does the red look in the second photo?nn[QUARTAFOTO]nnI ended up reducing the temperature a little so the photo wouldn’t look so red, and the photo looked more natural.nn[QUINTAFOTO]nnBefore and afternnDone! Here’s the before and after. Have you noticed how in the first photo there’s a hand in my shoulder but it is gone in the second one? Well, I made it disappear using the “acne” feature, the same one we use to remove pimples and stains we do not want in our photo. You only have to click on the parts you wish to remove, the secret is doing it patiently so the photo won’t get distorted."}” data-sheets-userformat=”{"2":5059,"3":{"1":0},"4":[null,2,13689059],"9":0,"10":0,"11":4,"12":0,"15":"Roboto"}”>
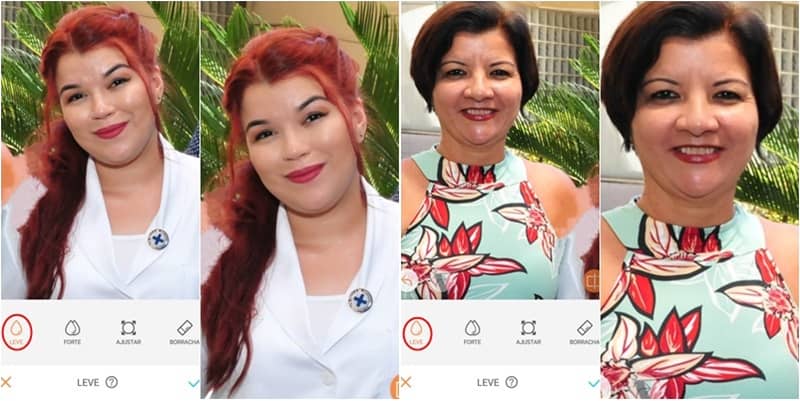
I started out with the “smooth” feature to reduce the oily skin a bit in both me and my mom. This tool is great for when we take pictures on hot days and we look a bit sweaty. It’s super easy, just move your finger across the places you want to edit, and that’s it!
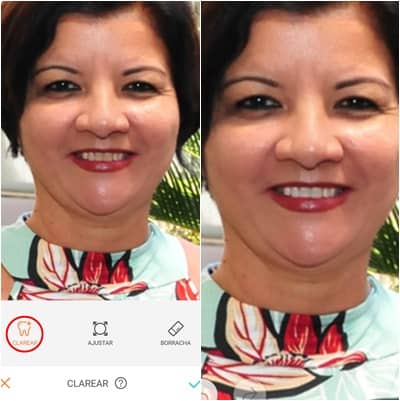
enhance to alter some things manually; and I raised the contrast a bit, as you can see in the photo above.nn[TERCEIRAFOTO]nnFinal touch upsnWithin "enhance", I increased the "sharpen" level a bit, this tool highlights the details of the photo; and I also increased the "saturation" levels so that the photo would look more alive. Did you see how much more intense does the red look in the second photo?nn[QUARTAFOTO]nnI ended up reducing the temperature a little so the photo wouldn’t look so red, and the photo looked more natural.nn[QUINTAFOTO]nnBefore and afternnDone! Here’s the before and after. Have you noticed how in the first photo there’s a hand in my shoulder but it is gone in the second one? Well, I made it disappear using the “acne” feature, the same one we use to remove pimples and stains we do not want in our photo. You only have to click on the parts you wish to remove, the secret is doing it patiently so the photo won’t get distorted."}” data-sheets-userformat=”{"2":5059,"3":{"1":0},"4":[null,2,13689059],"9":0,"10":0,"11":4,"12":0,"15":"Roboto"}”>Then I proceeded to whitened my mom’s teeth using the “whiten” feature. At this point it is very important that you pass your finger very carefully in the places where you want to edit, otherwise it may look a bit artificial.
Filters
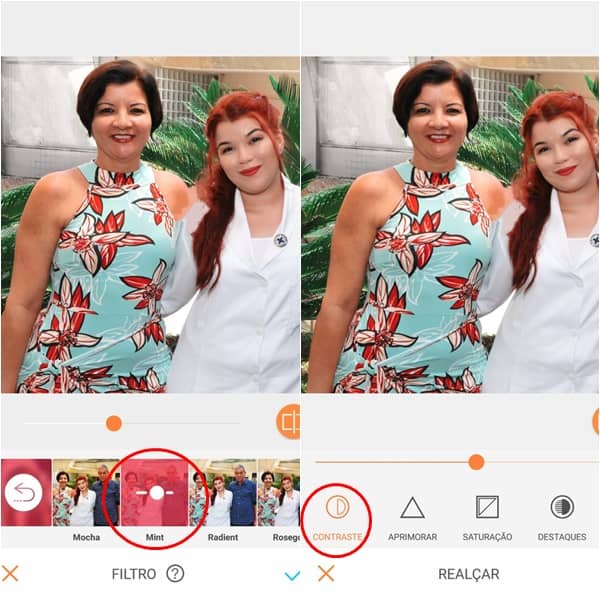
I applied the “mint” filter that is under the “vintage” set of filters. I love this filter because it leaves the photo a little red-ish and gives it a more cheerful touch. Then I went to tools> enhance to alter some things manually; and I raised the contrast a bit, as you can see in the photo above.
Final touch ups
Within “enhance”, I increased the “sharpen” level a bit, this tool highlights the details of the photo; and I also increased the “saturation” levels so that the photo would look more alive. Did you see how much more intense does the red look in the second photo?
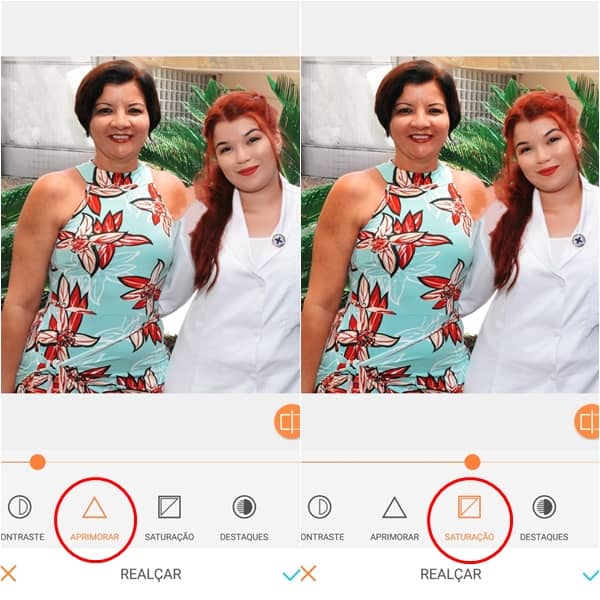
I ended up reducing the temperature a little so the photo wouldn’t look so red, and the photo looked more natural.

Before and after
Done! Here’s the before and after. Have you noticed how in the first photo there’s a hand in my shoulder but it is gone in the second one? Well, I made it disappear using the “acne” feature, the same one we use to remove pimples and stains we do not want in our photo. You only have to click on the parts you wish to remove, the secret is doing it patiently so the photo won’t get distorted.

Our final photo has a lot more life and color, as the moments we spend with our mothers should be, captured in our memories forever, but also in our hearts. ♥
Oh! When you are all set to post your photo with your mom on Instagram, don’t forget to use the hashtag #AirBrushMoms and tag Airbrush (@airbrushofficial) to have the possibility to win a WHOLE YEAR subscription on AirBrush Black/Premium! I’m all ready to post mine 😉
I wish y’all a great Mother’s day. And always remember the true meaning of this special date.
Kisses, until the next one 😉


